Gtk4DotNet 9.0.33-beta
See the version list below for details.
dotnet add package Gtk4DotNet --version 9.0.33-beta
NuGet\Install-Package Gtk4DotNet -Version 9.0.33-beta
<PackageReference Include="Gtk4DotNet" Version="9.0.33-beta" />
<PackageVersion Include="Gtk4DotNet" Version="9.0.33-beta" />
<PackageReference Include="Gtk4DotNet" />
paket add Gtk4DotNet --version 9.0.33-beta
#r "nuget: Gtk4DotNet, 9.0.33-beta"
#:package Gtk4DotNet@9.0.33-beta
#addin nuget:?package=Gtk4DotNet&version=9.0.33-beta&prerelease
#tool nuget:?package=Gtk4DotNet&version=9.0.33-beta&prerelease
Gtk4DotNet
C# .NET 10 bindings for GTK4. You can create programs using the GTK4 UI system as a .NET 10 app.
Highlights:
- Very lightweight approach, functional and object oriented.
- Support of template.ui resources as .NET resources so that the UI can be designed with Cambalache.
- Sub classing of Gtk Widget the C# way, not the Gtk way. It is very simple to create a Widget in a C# class that is inhherited from a GTK Widget. The UI of this custom widget can be defined in a UI template if it is a composite Widget.
- Mapping of the Gtk Threading and Gtk Main Event Loop to async/await with Synchronization context, so that asynchronous workflows or running in UI thread can be completely solved with async/await in C#.
- GTk4 property bindings to C# properties in a DataContext implementing INotifyProperty like WPF.
- Support for Adwaita
- GSettings support without the need to install them as super user.
The following tutorial contains the ExampleApp (and others) from the original GTK4 documentation as well the ToDo List app from GUI development with Rust and GTK 4, all ported to C#.
All Samples can be found in the Tests folder of https://github.com/uriegel/Gtk4DotNet
Remarks to Version 9.0:
Version 9.0 is a breaking change to older versions of this C# class library. That was necessary because the focus was shifted from functional building of the UI to easy subclassing of parts of the UI as C# objects so that bigger projects can be better modularized.
More emphasis was placed on changing UI state and reacting on UI actions than on building the UI.
The functional builder concept has been partially retained, but now it is strongly recommended to use Gtk template.ui in connection with subbclassed Gtk widgets.
Table of contents
- Hello World app and introduction to Gtk4DotNet
- Including Widgets to the Window - Memory management
- Using an UI template from .NET resource - Window subclassing
- Using stylesheets
- Using Gtk actions
- Bindings
- Using multiple windows
- Subclassing a widget from a builder template
Hello World app and introduction to Gtk4DotNet
Necessary prerequisites only depending on the version of Linux
On modern Linux like Ubuntu 24.04 or Fedora 40 Gtk4DotNet apps will run out of the box (if you create a full contained single file exe), otherwise you have to install the necessary dotnet runtime.
libadwaita is only necessary if you want to create Adwaita apps, and webkitgtk6 you only need when integrating a webview.
On older/other Linux systems perhaps you have to install one of the following packages in order to make the app runnable.
sudo apt install libgtk-4-dev
sudo apt install libadwaita-1-dev
sudo apt install libwebkitgtk-6.0-dev
For example on Linux Mint 22 you only have to install
sudo apt install libwebkitgtk-6.0-dev
if you want to use webkit webview whereas for KDE neon 6.0 you have to install
sudo apt install libadwaita-1-dev
sudo apt install libwebkitgtk-6.0-dev
Setup of a Gtk4DotNet program
You have to setup a .NET 10 console app.To access the library, you need a reference to the nuget package Gtk4DotNet. In your project, add it with the help of this command line command:
dotnet add package Gtk4DotNet
Thats all to build the simple HelloWorld app.
Application object
The most essential class is Application (together with Window).
You have to create an instance of Application, then call at least the method Run. Gtk4 will then be initialized, and the main event loop is started.
Almost all Gtk Objects are created with a static method, mostly New:
using Gtk4DotNet;

Application
    .New("de.uriegel.gtk4dotnet")
    .Run();
New demands the ApplicationID, a string that represents your app domain in reverse order.
This is the simplest Gtk Application. When you run the app, it stops immediatly with the following maeesage in command line:
(HelloWorld.dll:189798): GLib-GIO-WARNING **: 19:07:43.524: Your application does not implement g_application_activate() and has no handlers connected to the 'activate' signal. It should do one of these.
When the app is being activated, you have to implement the activate method. You can do this with a injected C# callback with the help of Application.OnActivate. Let's do this:
    var app = Application.New("de.uriegel.first");
    app.OnActivate(app => Console.WriteLine("App is being activated"));
    return app.Run(0, 0);
When you debug the program, OnActivate is being called and returns immediately. When app.Run() is being executed, the injected callback is being called and the text is being displayed in the terminal. However, the app also stops immediately. Of cource some kind of UI has to be created.
Let's create a window, this has to be done in the Application.OnActivate callback:
app.OnActivate(app =>
{
    var windows = app.NewWindow();
    windows.Show();
});
Now an empty default window is being shown and the function call Application.Run() will only return when the window is being closed.
And now your first Gtk window is being shown!
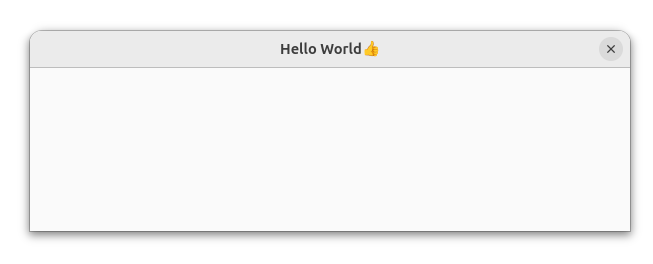
Hello World
For a Hello World app it is used to display the Text "Hello World". We set thewindow title to this string, and set the default size of the window, and our Hello World app is finished:
using Gtk4DotNet;

Application
    .New("de.uriegel.gtk4dotnet")
    .OnActivate(app => app
        .NewWindow()
        .Title("Hello World👍")
        .DefaultSize(600, 200)
        .Show()
    ).Run();
Many Methods returns their own instance, so that you can chain function calls in a builder way.
If you download the project from https://github.com/uriegel/Gtk4DotNet/ you can start the Test program 'HelloWorld' from Visual Studio Code.
Including Widgets to the Window - Memory management
A Window can have a child widget, and widgets can also have children/a single child.
Every widget is inherited from GObject. GObject uses reference counting as a mechanism for lifetime management. In Gtk4DotNet every GObject and inherited class implements IDisposable to unref a reference. But Gtk takes over lifetime management when a widget is member of a window hierarchy that is presented. Every widget such as Label, Button or CheckButton is inherited from Widget, and Widget has the property AutoDestroyed set to true. In this case Dispose() does nothing.
So every widget implements IDisposable like the GObject base class, but memory management is in the hand of GTK. This means when you create a widget like a Button, and you don't add t to a window, the object is never being freed! But it makes no sense to create a widget and don't display it!
To check if all objects are being freed after the app has exited, there is a control mechanism. You can enable it with the help of the method Application.WithDiagnostics(). It should be the first method called on the application object:
Application
    .New("de.uriegel.gtk4dotnet")
    .WithDiagnostics(true)
    .OnActivate(app => app
    ...
If WithDiagnostics is called with parameter true, every object that is being freed will be logged in the console. Otherwise only the dangling objects are being displayed after the app has exited.
In the next test program 'PackButtons', three Buttons are being included in a Grid, which is the child of the window. It is the transformation of the sample 'Packing Buttons' from the GTK4 documentation:
using Gtk4DotNet;
using CsTools.Extensions;

using static System.Console;

Application
    .New("de.uriegel.gtk4dotnet")
    .WithDiagnostics(true)
    .OnActivate(app => app
        .NewWindow()
        .Title("Pack👍")
        .Pipe(win => win.Child(
            Grid
                .New()
                .Attach(
                    Button
                        .NewWithLabel("Button 1")
                        .SideEffect(b => b.OnClicked += () => WriteLine("Button1 clicked")), 0, 0, 1, 1)
                .Attach(
                    Button
                        .NewWithLabel("Button 2")
                        .SideEffect(b => b.OnClicked += () => WriteLine("Button2 clicked")), 1, 0, 1, 1)
                .Attach(
                    Button
                        .NewWithLabel("Quit")
                        .SideEffect(b => b.OnClicked += () => win.CloseWindow()), 0, 1, 2, 1)))
        .Show()
  ).Run();
Gtk4DotNet has the nuget package CsTools included, which has some functional extensions like Pipe() or SideEffect() to be used in the functional flow of the builder. pattern.
Using an UI template from .NET resource - Window subclassing
Using an UI template
With the functional builder approach you can nicely build small programs. But when the app becomes bigger, there this approach has disadvantages:
- There is no separation of UI and functionality
- Using state is a problem
- Reacting on UI in connection with state is also problem
- It is not so easy to create sub modules of the UI.
Therefore the GTK approch with a template.UI (always containig <object> as the root element, not <template>!) is a good way to biuld our UI. This can be done with Cambalache.
The templates are shipped with the program the C# way, using.NET resources.
The next sample (Builder) is the conversion of the previous sample. Our template.ui look like this:
<?xml version='1.0' encoding='UTF-8'?>

<interface>

  <requires lib="gtk" version="4.20"/>
  <object class="GtkWindow" id="window">
    <property name="resizable">False</property>
    <property name="title">Builder👍</property>
    <child>
      <object class="GtkGrid" id="grid">
        <property name="column-homogeneous">True</property>
        <property name="column-spacing">5</property>
        <property name="margin-bottom">5</property>
        <property name="margin-end">5</property>
        <property name="margin-start">5</property>
        <property name="margin-top">5</property>
        <property name="row-spacing">5</property>
        <child>
          <object class="GtkButton" id="button1">
            <property name="label">Button 1</property>
            <layout>
              <property name="column">0</property>
              <property name="column-span">1</property>
              <property name="row">0</property>
              <property name="row-span">1</property>
            </layout>
          </object>
        </child>
        <child>
          <object class="GtkButton" id="button2">
            <property name="label">Button 2</property>
            <layout>
              <property name="column">1</property>
              <property name="column-span">1</property>
              <property name="row">0</property>
              <property name="row-span">1</property>
            </layout>
          </object>
        </child>
        <child>
          <object class="GtkButton" id="quit">
            <property name="label">Quit</property>
            <layout>
              <property name="column">0</property>
              <property name="column-span">2</property>
              <property name="row">1</property>
              <property name="row-span">1</property>
            </layout>
          </object>
        </child>
      </object>
    </child>
  </object>
</interface>
As said before, this file will be included as .NET resource, so in the Builder.csproj the following is added:
  <ItemGroup>
    <EmbeddedResource Include="./window.ui">
      <LogicalName>window</LogicalName>
    </EmbeddedResource>
  </ItemGroup>
Our main prograsm now looks very small:
Application
    .NewAdwaita("de.uriegel.gtk4dotnet")
    .WithDiagnostics(true)
    .OnActivate(app => app
        .WindowFromBuilder("window", "window", p => new MyWindow(p))
        .Show()
    ).Run();
Window subclassing
In this sample we build an Adwaita app instead of a Gtk4 app (Application.NewAdwaita()). Now our app blends well with modern Gnome.
But the interresting change is this line of code:
.WindowFromBuilder("window", "window", p => new MyWindow(p))
The main window is build from the template resource. The first parameter is the logical name of the resource, the second the name of the window, and the third a constructor function.
The main window is a custom class MyWindow based on ApplicationWindow. ApplicationWindow is based on Window, but acts as the top level window of the app. It can have Gtk actions.
To be built by this concept, it must have a special constructor:
class MyWindow : ApplicationWindow
{
    public MyWindow(WindowBuilder builder) : base(builder)
    {
        ...
    }
}
The constructor of the custom class must have a WindowBuilder paramter included and with this calls the base constructor. The WindowBuilder is delivered by the constructor callback ofApplication.WindowFromBuilder(). This alone is sufficient to instanciate the custom subclassed Window.
But how can we access the included widgets? That is very simple. Every widget that should be accessedgets a corresponding field in the MyWindow class. It then has to be annotated with the C# Attribute [Widget]. As long as the name of this field is the same as the corresponding object name in the template.ui, that is enough, and the field is automatically initialized from the builder. If the name differs, the widget's name in the template.ui has to be specified in the WidgetAttribute lige this: ```[Widget(Name='name of the widget in the template')].
The field are all initialized to null!. That is to satisfy the C# compiler that all fields are not nullable (because thes are not unless a design error has occured, name mismatching).
Now our Window looks like this:
using Gtk4DotNet;

class MyWindow : ApplicationWindow
{
    public MyWindow(WindowBuilder builder) : base(builder)
    {
        button1.OnClicked += () => Console.WriteLine("Button1 clicked");
        button2.OnClicked += () => Console.WriteLine("Button2 clicked");
        quit.OnClicked += CloseWindow;
    }

    [Widget]
    readonly Button button1 = null!;

    [Widget]
    readonly MyButton button2 = null!;

    [Widget]
    readonly Button quit = null!;
}

class MyButton : Button
{
    public MyButton(Builder builder, string? name = null) : base(builder, name)
        => Console.WriteLine("My custom Button created");
}
Only the three buttons needs to be accessed in code, so there are only three field, not the Grid. One button is subclassed too. Therefore a special constructor similar to the one of the MyWindow class is needed.
Now we have the same program as before, only better structured.
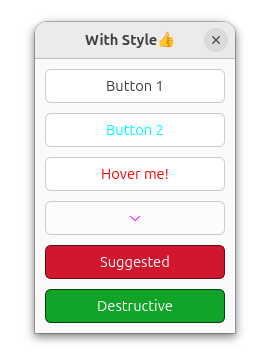
Using stylesheets
The next sample WithStyle shows the using of a style sheet. Of course itwill be provided the C# way, with the help of a .NET Resource.
So here is our stylesheet style.css:
button.button-1 {
  color: cyan;
}

button#button-2 {
    color: red;
}

button#button-2:hover {
  color: magenta;
  background: yellow;
}

menubutton arrow {
  color: magenta;
}
button-1is a class namebutton-2is the name of the 2nd Button:hoveris a pseudo class getting active when hovering the widget- arrow is a css node. Some composite Widgets have special nodes for its sub components
The style.css have to be included as .NET resource. It can be activated via
StyleContext.AddProviderForDisplay(
            Display.GetDefault(),
            CssProvider.New().FromResource("style"),
            StyleProviderPriority.Application)
The program now looks like:
Application
    .New("de.uriegel.gtk4dotnet")
    .WithDiagnostics(true)
    .OnActivate(app => app
        .NewWindow()
        .Title("With Style👍")
        .DefaultSize(200, 200)
        .SideEffect(_ => StyleContext.AddProviderForDisplay(
            Display.GetDefault(),
            CssProvider.New().FromResource("style"),
            StyleProviderPriority.Application))
        .Child(Box
            .New(Orientation.Vertical, 10)
            .Margin(10)
            .Append(Button.NewWithLabel("Button 1"))
            .Append(Button.NewWithLabel("Button 2").CssClass("button-1"))
            .Append(Button.NewWithLabel("Hover me!").SetName("button-2"))
            .Append(MenuButton.New())
            .Append(Button.NewWithLabel("Suggested").CssClass("destructive-action"))
            .Append(Button.NewWithLabel("Destructive").CssClass("suggested-action")))
        .Show()
    ).Run();
The last two buttons were provided with CSS rules provided by GTK: "Suggested" and "Destructive". The app looks like this when started:
Using Gtk actions
Gtk actions are a means to abstract UI from code logic. They can be added to the application and then act application-wide for all top level window, or they can be inserted to a window, or to special ActionGroups.
To Add actions to the application or to a Window, all you have to do is to call Actions() and add the actions. In our example Actions the following SimpleAction is added:
    .OnActivate(app => app
        .Actions(new SimpleAction("test", () => Console.WriteLine("Test action from app"), "<Ctrl>T"))
The action has the name "test", on activation it will be calling the specified lambda, and it can be activated via keyboard with the shortcut Ctrl-T
Linking an action to a widget in a template
The actions for MyWindow are inserted as well in the constructor:
public MyWindow(WindowBuilder builder) : base(builder)
    {
        AddActions(
            new BoolAction("preview", false, show => Console.WriteLine($"Preview: {show}"), "F3"),
            new SimpleAction("quit", CloseWindow, "<Ctrl>Q")
        );
    }
Actions can only be added to ApplicationWindow
The action name correspond with the action name given in the template.ui, for example:
    <object class="GtkToggleButton" id="preview_button">
        <property name="action-name">win.preview</property>
        <property name="icon-name">x-office-presentation</property>
    </object>
The group name for actions added to an ApplicationWindow is ```win.``
The first action in the sample is a 'stateful action'. The state of the ToggleButton is delivered in the callback of the action and an initial state has to be provided on creation of the stateful action.
Bindings
GTK properties of widgets can be bound to properties in a DataContext implementing INotifyPropertyChanged like Binding in WPF. This is a step further to separate the UI from the functionality.
To use a DataContext, it has to be added to a widget. This DataContext is then usable in all sub widgets that are contained in the widget with the DataContext.
In our sample Bindings the DataContext is defined like this:
class WindowDataContext : INotifyPropertyChanged
{
    public string Name
    {
        get => field ?? "";
        set
        {
            field = value;
            OnChanged(nameof(Name));
        }
    }

    public bool Active
    {
        get;
        set
        {
            field = value;
            OnChanged(nameof(Active));
        }
    }

    public event PropertyChangedEventHandler? PropertyChanged;

    void OnChanged(string name) => PropertyChanged?.Invoke(this, new(name));
}
There are two Properties Name and ```Active", that can be changed from code, and the UI reacts on these changes. Two-way bindings are also possible.
In this sample the DataContext is set to the Box containig all widgets:
box.DataContext = dataContext;
and DataContext is a field in MyWindow subclass:
readonly WindowDataContext dataContext = new();
A simple binding is set like this:
label1.SetBinding("label", nameof(WindowDataContext.Name));
The Label property of the Label label1 is bound to the DataContext property with the name "Name". Whenever you change this property in code, the Label label1 reacts with showing the changed name.
This can also be done from an asynchronous Lambda after a while:
        button1.OnClicked += async () =>
        {
            dataContext.Name = "Name was changed to John Doe";
            await Task.Delay(2000);
            dataContext.Name = "Name was changed back to URiegel";
        };
And it can even be done from a thread different to the GTK UI thread:
        button1.OnClicked += () =>
        {
            dataContext.Name = "Name was changed to John Doe";
            new Thread(() =>
            {
                Thread.Sleep(4000);
                dataContext.Name = "Name was changed from a background thread";
            }).Start();
        };
The widget editable is bound to property Name in a two-way-binding meaning that it reacts to name changing from code but also the DataContext property reacts to changes in the editable.
editable.Binding("text", nameof(WindowDataContext.Name), BindingFlags.Bidirectional);
You can add a converter callback function to adapt the value of the property in DataCOntext to the widgets value:
.Binding("label", nameof(WindowDataContext.Active), converter: b => (bool)b! ? "true" : "false")
This is the complete code of MyWindow from sample project Bindings:
using System.ComponentModel;
using Gtk4DotNet;

class MyWindow : ApplicationWindow
{
    public MyWindow(WindowBuilder builder) : base(builder)
    {
        StyleContext.AddProviderForDisplay(
            Display.GetDefault(),
            CssProvider.New().FromResource("style"),
            StyleProviderPriority.Application);

        box.DataContext = dataContext;
        label1.SetBinding("label", nameof(WindowDataContext.Name));
        button1.OnClicked += async () =>
        {
            dataContext.Name = "Name was changed to John Doe";
            await Task.Delay(2000);
            dataContext.Name = "Name was changed back to URiegel";
        };
        buttonEmpty.OnClicked += () => dataContext.Name = "";
        buttonNull.OnClicked += () => dataContext.Name = null!;
        label2.SetBinding("label", nameof(WindowDataContext.Active));
        label3
            .Binding("label", nameof(WindowDataContext.Active), converter: b => (bool)b! ? "true" : "false")
            .SetBindingToCss("yellow", nameof(WindowDataContext.Active));
        checkBtn1.SetBinding("active", nameof(WindowDataContext.Active), BindingFlags.Bidirectional);
        checkBtn2.SetBinding("active", nameof(WindowDataContext.Active));
        trigger.OnToggled += b => dataContext.Active = b;
        editable.Binding("text", nameof(WindowDataContext.Name), BindingFlags.Bidirectional);
        editable["editing"].OnNotify += () => Console.WriteLine("Editing...");
    }

    readonly WindowDataContext dataContext = new();

    [Widget]
    readonly Widget box = null!;

    [Widget]
    readonly Widget label1 = null!;

    [Widget]
    readonly Widget label2 = null!;

    [Widget]
    readonly Widget label3 = null!;

    [Widget]
    readonly Button button1 = null!;

    [Widget]
    readonly Button buttonEmpty = null!;

    [Widget]
    readonly Button buttonNull = null!;

    [Widget(Name = "chk_1")]
    readonly Widget checkBtn1 = null!;

    [Widget(Name = "chk_2")]
    readonly Widget checkBtn2 = null!;

    [Widget(Name = "chk_trigger")]
    readonly CheckButton trigger = null!;

    [Widget]
    readonly Widget editable = null!;
}

class WindowDataContext : INotifyPropertyChanged
{
    public string Name
    {
        get => field ?? "";
        set
        {
            field = value;
            OnChanged(nameof(Name));
        }
    }

    public bool Active
    {
        get;
        set
        {
            field = value;
            OnChanged(nameof(Active));
        }
    }

    public event PropertyChangedEventHandler? PropertyChanged;

    void OnChanged(string name) => PropertyChanged?.Invoke(this, new(name));
}
Using multiple windows
If you want to create a new window from the ApplicationWindow, you have to do this:
using CsTools.Extensions;
using Gtk4DotNet;

Application
    .New("de.uriegel.gtk4dotnet")
    .WithDiagnostics(true)
    .OnActivate(app => app
        .NewWindow()
        .Title("Multiple Window👍")
        .Child(Button
            .NewWithLabel("Create Window")
            .SideEffect(b => b.OnClicked += () =>
            {
                var win = new MyWindow();
                win.Show();
            }))
        .Show()
    ).Run();
with the MyWindow inherited from Window:
class MyWindow : Window
If you run the program the following error is displayed in the console when you click the button:
(MultipleWindows.dll:66180): Gtk-CRITICAL **: 10:42:41.033: gtk_widget_show: assertion 'GTK_IS_WIDGET (widget)' failed
MyWindow is inherited from Window, but Gtk doesn't know about creating a new Window. In the constructor of MyWindow you have to call Construct():
    public MyWindow()
    {
        Construct();
        Title = "My custom Window";
    }
Now the newly created windows are displayed. Construct() must be the first function call in the constuctor, otherwise the call to Title() fails.
If you close all instances of MyWindow and then the amin application window, no error occured. But when you close the Application window first, there are warnings in the console displayed, when WithDiagnostics() is set:
3 Dangling GObjects: DelegateInfo { Delegate = Gtk4DotNet.Internals.TwoPointerDelegate, Name = SetDiagnostics, TypeName = MyWindow }
Three instances of MyWindow were not freed.
If you want to expand the lifetime of the app to the lifetime of all windows (so that all windows are freed eventually), you have to add the newly created windows to the Application:
    public MyWindow(Application app)
    {
        Construct();
        Title = "My custom Window";
        app.AddWindow(this);
    }
and creating the window with the app as parameter:
    .SideEffect(b => b.OnClicked += () =>
    {
        var win = new MyWindow(app);
        win.Show();
    }))
Now the instances of all windows are being freed, and the app exits when <b>all</b> windows are closed.
Subclassing a widget from a builder template
Using the main template.ui
Example Progress demonstrates a custom widget based on a Revealer widget that is included in a template:
...
    <child type="end">
        <object class="GtkRevealer" id="revealer">
        <property name="transition-type">slide-left</property>
        <child>
            <object class="GtkMenuButton">
            <property name="popover">
                <object class="GtkPopover">
                <child>
                    <object class="GtkProgressBar" id="progress_bar">
                    <property name="show-text">True</property>
                    </object>
                </child>
                </object>
            </property>
            <child>
                <object class="GtkDrawingArea" id="progress_area"/>
            </child>
            </object>
        </child>
        </object>
    </child>
...
Template element GtkRevealer with the template name "revealer" should be customized in a class "ProgressDisplay" based on Revealer. In this custom widget all included widgets should be accessible.
To create a subclass of Revealer (ProgressDisplay), you have to create a field in MyWindow:
    [Widget]
    readonly ProgressDisplay revealer = null!;
like you used to. One problem is, that the field is not being used in MyWindow, so the compiler gives a warning about never using revealer. You can work around this this:
    public MyWindow(WindowBuilder builder) : base(builder)
    {
        _ = revealer;
    }
This is the implementation of ProgressDisplay:
class ProgressDisplay : Revealer
{
    public ProgressDisplay(Builder builder, string name) : base(builder, name)
    {
        AddCssClass("custom-accent");
        drawingArea.SetDrawFunction(Draw);
        this["reveal-child"].OnNotify += MakeProgress;
        starter.BindProperty("active", this, "reveal-child", BindingFlags.Bidirectional);
        OnFinalize(async () =>
        {
            closing = true;
            await Task.Delay(400);
        });
    }

    void Draw(DrawingArea area, Cairo cairo, int w, int h)
    {
        ...
    }

    async void MakeProgress()
    {
        ...
    }

    [Widget(Name = "progress_bar")]
    ProgressBar progressBar = null!;

    [Widget(Name = "progress_area")]
    DrawingArea drawingArea = null!;

    [Widget]
    Widget starter = null!;

    float progress = 0.0f;
    bool closing;
    int activeId;
}
In this composite control you can access all field like before.
The sample code can be found in project "Progress"
Using a separate template.ui for the custom ProgressDisplay
There is one problem with the last approach for subclassing:
- The complete UI is in one big template file for the window and additionally with the definition of the subclassed ProgressDisplay
That would be better:
- A template.ui for the main window and the custom ProgressDIsplay, but without internal widgets
- An additional template.ui for the internals of the ProgressDisplay.
No problem with Gtk4DotNet!
Changes in the main template:
    ...
    <child type="end">
        <object class="GtkBox" id="progressDisplay"/>
    </child>
    ...
Only a GtkBox as a placeholder with the ProgressDisplays name
The definition of the custom control's UI is in the .NET resource file progress.ui with the logical name "progress":
<?xml version='1.0' encoding='UTF-8'?>

<interface>

  <requires lib="adw" version="1.0"/>
  <requires lib="gtk" version="4.6"/>
  <object class="GtkRevealer" id="progressDisplay">
    <property name="transition-type">slide-left</property>
    <child>
      <object class="GtkMenuButton">
        <property name="popover">
          <object class="GtkPopover">
            <child>
              <object class="GtkProgressBar" id="progress_bar">
                <property name="show-text">True</property>
              </object>
            </child>
          </object>
        </property>
        <child>
          <object class="GtkDrawingArea" id="progress_area"/>
        </child>
      </object>
    </child>
  </object>
</interface>
In the MyWindow class this custom control is instantiated with a field like before, but you must specify the name of the template:
    [Widget(Template = "progress")]
    ProgressDisplay progressDisplay = null!;
In the MyWindow class you can access the custom ProgressDisplay, e.g set a binding, in this case not a binding to DataContext, but to a Gtk property:
    public MyWindow(WindowBuilder builder) : base(builder)
    {
        ...
        starter.BindProperty("active", progressDisplay, "reveal-child", BindingFlags.Bidirectional);
    }
When the GtkToggleButton with the name "starter" is active, the custom control based on a Revealer is being revealed and vice versa.
The implementation of ProgressControl is almost identical as in the previous sample with the example of the activation (the revealing) which is done in the main window.
The sample code can be found in project "ProgressSubclass".
| Product | Versions Compatible and additional computed target framework versions. |
|---|---|
| .NET | net10.0 is compatible. net10.0-android was computed. net10.0-browser was computed. net10.0-ios was computed. net10.0-maccatalyst was computed. net10.0-macos was computed. net10.0-tvos was computed. net10.0-windows was computed. |
-
net10.0
- CsTools (>= 9.0.1)
NuGet packages (3)
Showing the top 3 NuGet packages that depend on Gtk4DotNet:
| Package | Downloads |
|---|---|
|
WebWindowNetCore
A C# Webview Application for Windows and Linux similar to Electron based on WebView2 (Windows) and GTK WebKit (Linux) |
|
|
WebWindowNetCore.Linux
A C# Webview Application for Linux similar to Electron based on GTK WebKit |
|
|
Gtk4DotNet.FSharp
.NET 8 F# Bindings for GTK 4, functional declarative similar to REACT or Kotlin Compose |
GitHub repositories
This package is not used by any popular GitHub repositories.
| Version | Downloads | Last Updated |
|---|---|---|
| 9.0.37-beta | 0 | 7/1/2026 |
| 9.0.36-beta | 47 | 6/29/2026 |
| 9.0.35-beta | 48 | 6/29/2026 |
| 9.0.34-beta | 48 | 6/29/2026 |
| 9.0.33-beta | 47 | 6/29/2026 |
| 9.0.32-beta | 50 | 6/29/2026 |
| 9.0.31-beta | 44 | 6/28/2026 |
| 9.0.30-beta | 47 | 6/28/2026 |
| 9.0.29-beta | 54 | 6/27/2026 |
| 9.0.28-beta | 50 | 6/27/2026 |
| 9.0.27-beta | 50 | 6/27/2026 |
| 9.0.26-beta | 49 | 6/26/2026 |
| 9.0.25-beta | 50 | 6/26/2026 |
| 9.0.24-beta | 53 | 6/25/2026 |
| 9.0.23-beta | 69 | 6/25/2026 |
| 9.0.22-beta | 99 | 6/24/2026 |
| 9.0.21-beta | 107 | 6/21/2026 |
| 9.0.20-beta | 105 | 6/20/2026 |
| 9.0.19-beta | 95 | 6/20/2026 |
| 8.2.1 | 107 | 6/6/2026 |